![]()
![]()
![]()
![]()
![]()
![]()
![]()
USER MANUAL
![]()
![]()
CONTENTS
1. Installing Table Tennis Pro
1.1 Downloading and installing from the web
1.2 Installing DirectX
2.1 Shot Types
2.2 Spin Controls Option
2.3 Everything Before the Ball hits the Bat
2.4 Power: Controlling the Direction of your Shot
2.5 Adding Spin to your Shot
2.6 Summary: The Stages in Taking a Shot
2.7 Control Tips
4.1 Cameras
4.2 Speeding up the Graphics
4.3 The Force Field
![]()
![]()
1. INSTALLING TABLE TENNIS PRO
![]()
1.1 - DOWNLOADING AND INSTALLING FROM THE WEB
To install Table Tennis Pro, you will need to download the game first from the internet. To get the latest version of the game go to :
After downloading the file, run it to install the game.
![]()
1.2 - INSTALLING DIRECTX
DirectX version 8 or later is needed to run the game. This may or may not already be installed on your machine. The easiest way to find out is to try and run the game first. If it is not installed, the game will inform you, and exit. Windows XP users do not need to install DirectX as is already installed with Windows XP.
To install DirectX you will need to download and install the latest version of DirectX from the Internet. To do this, go to:
![]()
![]()
2. CONTROLLING THE BALL
Full ball control is possible in Table Tennis Pro - you can hit the ball anywhere you like anyhow, and always have complete control over it. Nothing is added by the computer - what you do with the mouse fully controls your shot.
Note, all explanations below are for using a mouse with the default control settings. You can also use other control devices, but a mouse, or similar control (some have said that using a trackball works quite well also), is preferred as it gives more accurate and faster control.
![]()
2.1 - SHOT TYPES
When taking a shot, the first thing you have to decide is what type of shot you wish to hit.
There are three different types of shots - each is selected by pressing one or more of the mouse buttons as follows:
|
SHOT
TYPE
|
MOUSE
BUTTON(s)
|
DESCRIPTION
|
VISUAL
|
|
LOB
|
Left
Button
|
A
soft shot that is hit upwards initially over the net
|
 |
|
FAST
|
Right
Button
|
A
faster almost flat shot that soars over the net
|
 |
|
SMASH
|
Left and Right Button Together or Middle Button |
A
very hard shot hit downwards
|
 |
![]()
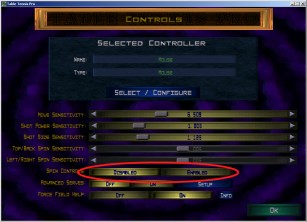
2.2 - SPIN CONTROLS OPTION
Before explaining power and spin, you must know about the Spin Controls option. This option is in the Options->Controls menu :
Spin Controls should be turned Off for beginners (this is the default setting). Although spins are loads of fun, mastering adding power and spin to the ball is too much to get the hang of at the start. For this reason, leave them off for now and when you master adding power to the ball, and can hit the ball in any direction you wish with ease, then you can go back and turn them on.
![]()
2.3 - EVERYTHING BEFORE THE BALL HITS THE BAT
In Table Tennis Pro, all your control movements must be done before the ball hits your bat. Any mouse movements or button presses that you do after the ball hits the bat will have no effect. This makes the controls of the game different from other games.
This is the same as in real-life. If you are playing table tennis for real you may notice that after you hit the ball with your bat, any amount of swinging the bat will have no affect on how the ball continues along its course. :-)
![]()
2.4 - POWER: CONTROLLING THE DIRECTION OF YOUR SHOT
So, now that you have chosen your shot type and realize that you must do everything before the ball hits your bat, you are ready to try adding power to the ball. To do this is simple. After you press the mouse button to choose your shot, do not release it, but hold it down and move the mouse. This adds power as follows:
Mouse Left Hit the Ball Right Mouse Right Hit the Ball Left Mouse Up Reduce the Power of the Shot (make it Shorter) Mouse Down Add Power to the Shot (make it Longer)
All this to be done before the ball hits the bat.
![]()
2.5 - ADDING SPIN TO YOUR SHOT
Do not attempt this until you have mastered Power and can place the ball at any corner of the table you choose.
To add Spin, first you must turn On the Spin Controls in the Options -> Controls menu as shown above.
Then to add spin, you have to first release the mouse button you were holding down to add Power, and then move the mouse again, as follows:
| Mouse Left | Add Right Spin |
| Mouse Right | Add Left Spin |
| Mouse Up | Add Top Spin |
| Mouse Down | Add Back Spin |
Again, to be done before the ball hits the bat.
![]()
2.6 - SUMMARY: THE STAGES IN TAKING A SHOT
The full process of Choosing a Shot Type, adding Power and finally adding Spin is as follows:
1. Decide what shot type you are going to take
2. Hold down the shot type button(s)
3. Move the mouse to add Power
4. Release the mouse button(s)
5. Move the mouse to add Power
And again, all these actions to be done before the ball hits the bat. Its not easy, but it is possible.
![]()
2.7 - CONTROL TIPS
1. Turn off Spin Controls until you master adding Power.
2. Reduce the Game Speed (Options->Settings) to as slow as setting as you need until you get the hang of things, then later speed it up as you master the controls.
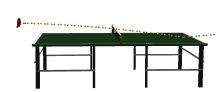
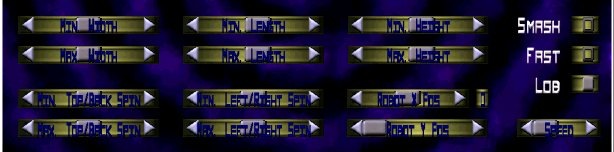
3. Play against the Robot in the Practice section. This Robot can be programmed as you like. For beginners, you should set it to hitting you straight lobs down the middle of the table. This can be done by programming the Robot using these settings:
4. Move back a bit from the table. Your bat does not have to be just at the end of the table but can be back a meter or much more from it. This gives you more time to prepare your shot. You can hit the ball as it reaches its maximum height or shortly after, as shown:
![]()
![]()
3. CUSTOMIZING YOUR BAT
![]()
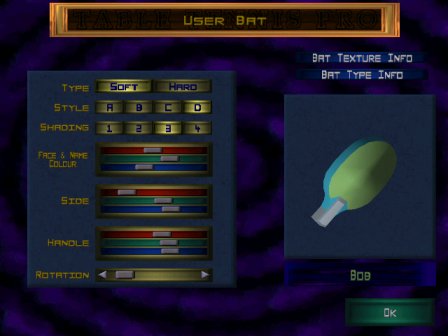
3.1 - THE USER BAT MENU
The User Bat menu is accessible by selecting first the Options menu and then clicking on User Bat and will appear something like this:
The various fields of the menu are explained in the following table.
Note that the Type field affects the way the game plays, whereas the others are only visual effects.
Controls the bounce of the ball against the bat.
Soft absorbs the incoming shot so it has little affect on your outgoing shot.
Hard means that some of the power of the incoming shot will be added to your outgoing shot.
3.2 - ADDING A DESIGN TO YOUR BAT
To add a design to your bat, you first need to create a Bitmap file outside of the game using a paint program.
The simplest way to do this is to copy a sample bat design file that is included in the game. To do this, you will need to access the Users folder in the folder where the game is installed. To do this, do the following:
. Press the Windows Start Button
. Select Run
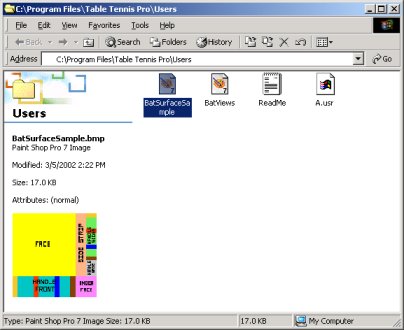
. Type in C:/Program Files/Table Tennis Pro/UsersThis will open a new window. You should see a file called BatSurfaceSample *. This is the file you will need to copy. To do this, select this file by clicking on it once. You should then have a window something like this:
Next select the menu Edit and select Copy , then again select the menu Edit and select Paste . This will create a new file in the same folder called Copy of BatSurfaceSample.
Next you need to rename this file to your bat design file. To do this, press the right mouse button on the file Copy of BatSurfaceSample and select Rename , then type in your user name that you use when playing the game, and press Enter.
Now you will created have your bat design file. To edit it, simply double-click it. Each section of the bitmap file represents a different part of your bat. These sections are best demonstrated by viewing the file BatViews in the same directory.
This new bat design file will automatically load the next time you start the game. Go to the User Bat menu to view it.
| *
Note If you see BatSurfaceSample.bmp and not BatSurfaceSample then you will need to rename the file to Username.bmp , where Username is the your user name in the game - e.g. Bob.bmp . |
![]()
![]()
4. ESSENTIAL THINGS TO KNOW
![]()
4.1 - CAMERAS
There are 12 different in-game cameras setup. To access these, press the keys F1 to F12 while playing the game.
There are also 12 cameras setup for Replays and watching Demo Matches. Again press the F1 to F12 keys to access these while watching a Replay or a Demo Match.
Each of these 24 Cameras can be changed to your liking in the Options->Cameras menu. Here you can choose the type of camera and various parameters of each camera. Have a look at the Field of View setting for some interesting effects.
See the Help->Cameras menu for more details.
A specific camera can also be adjusted while playing the game by holding down the Left Shift key and moving the mouse. Further parameters can be adjusted by also holding down one or both of the mouse buttons while doing this.
![]()
4.2 - SPEEDING UP THE GRAPHICS
There are a number of different ways to speed up the graphics of the game. You should experiment with these to see which work best for your machine.
4.2.1 RESOLUTION
Resolution is set in the Options->Graphics menu, under Resolution. A lower resolution normally means faster graphics, but may or may not depending on your graphics card. Lower resolution also reduces visual quality.
4.2.2 ANTI-ALIASING
Anti-Aliasing is also set in the Options->Graphics menu. This can greatly improve visual quality if turned on, but normally also slow things down a lot, so it is only recommenced to turn this on if you have a very fast graphics card.
4.2.3 ROOM AND TABLE SETTINGS
In the Options->Settings menu , using the Black room and/or using the Glass table will speed things up, but with obvious visual losses. This has no effect if the Fast Graphics Mode is being used (see next point).
4.2.4 SCREEN SIZE
Also in the Options->Graphics menu, this controls how large the screen is when playing the game. Smaller sizes should speed things up. You should first try to reduce the Resolution (above) in preference to using this setting.
4.2.4 FAST GRAPHICS MODE
If all the above fails, you can try this as a last resort. This option is also available in the Options->Graphics menu and is implemented mainly for people who do not have a 3d graphics card on their system.
Using the True 3D mode is the normal setting. Switching to the Fast mode can speed things up, but all moving cameras can not be used - only the Stationary camera type can be used.
Check the in-game Help->Graphics and Help->Settings menus if you need more information.
![]()
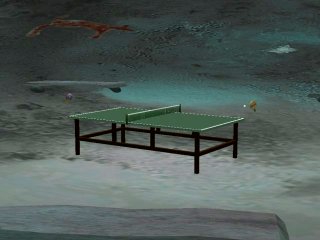
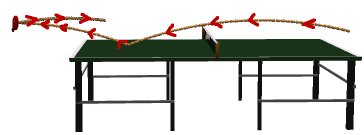
4.3 - THE FORCE FIELD
The Force Field is the Red Circle that appears around your bat before the start of each game as shown :
This is an area around your bat that will also return the ball even if the ball does not actually hit your bat.
It is turned on for beginners to make the game easier to play, but more advanced users should turn it off to give them more of a challenge. You can turn it on or off in the Options->Controls menu.
![]()
![]()
5. MISCELLANEOUS
![]()
5.1 - THE DELUXE EXPANSION PACK
The Deluxe Expansion Pack for Table Tennis Pro adds the following extra features to the game:
. . .
![]()
5.2 - MORE HELP
More help is available in the following places:
. In-Game Help - press the Help button in the game to get detailed help about most aspects of the game
. Web Support Page - go to : www.grassgames.com/support
. Online Forums - go to : www.grassgames.com/gamers/forum.html
![]()
![]()
![]()